You are not logged in.
- Topics: Active | Unanswered
#76 2016-09-21 20:49:50
- elliot
- Member
- Registered: 2016-04-28
- Posts: 109
Re: Auto Mask Generation
Hi Larry-
I tried to find the sensor you used on Amazon or spark fun but th pictures don't match up to what you have accomplished. Did you remove the sensor from the board to place it in the cone? How was this accomplished? Thanks!
Offline
#77 2016-09-22 03:23:24
- lcluff2000
- Member
- Registered: 2016-04-16
- Posts: 53
Re: Auto Mask Generation
I think you mean DLPrinter...
I'm curious too. The module you indicated was UVM-30A. I'm curious, how do you end up getting that module into the small tipped cone?
Offline
#78 2016-09-22 15:33:11

Re: Auto Mask Generation
Hi Larry-
I tried to find the sensor you used on Amazon or spark fun but th pictures don't match up to what you have accomplished. Did you remove the sensor from the board to place it in the cone? How was this accomplished? Thanks!
Aloha Larry- !![]()
Offline
#79 2016-09-22 15:38:24
Re: Auto Mask Generation
I think you mean DLPrinter...
I'm curious too. The module you indicated was UVM-30A. I'm curious, how do you end up getting that module into the small tipped cone?
just take out it by soldering-iron , it's simply sensor same as LED have two contact .
just not mistake polarity during action , make one side complete , then other

Last edited by DLprinter (2016-09-22 15:46:17)
Offline
#80 2016-09-22 18:03:58
- lcluff2000
- Member
- Registered: 2016-04-16
- Posts: 53
Re: Auto Mask Generation
Aloha! And thanks for the information!
Offline
#81 2016-09-26 15:33:09
- backXslash
- Member
- Registered: 2016-03-25
- Posts: 151
Re: Auto Mask Generation
If anyone wants or needs it, I modified some existing code from here. I used this same set up with the arduino, LCD shield, and ML8511 sensor, but refactored the code to be more-real time. I noticed that the static measurements weren't really useful for the way that NanoDLP wants to generate its mask, so I changed it to be a running average. The code take 6 readings off the sensor and averages them, then updates the display. When you're generating your mask, you can leave the sensor in the "box" you're measuring, and the longer it's there, the truer your average will be. The lowest consistent reading I got on my printer was a little over 2, so I dialed everything in to be within .05 of that.
I don't think it's good code (like at all), but it does work, so I hope it helps someone.
#include <LiquidCrystal.h>


//Pin assignments for SainSmart LCD Keypad Shield
LiquidCrystal lcd(8, 9, 4, 5, 6, 7);

//Hardware pin definitions
int UVOUT = A1; //Output from the sensor
int REF_3V3 = A2; //3.3V power on the Arduino board
float UV = 0; //UV sensor reading in mW/cm2
int UVRead = 0;
int button = A0;
int buttonRead = 0;
bool firstRun = 0;
float reading[] = {0,0,0,0,0,0};

void setup()
{
  lcd.begin(16, 2);
  Serial.begin(9600);
  pinMode(button, INPUT);
  pinMode(UVOUT, INPUT);
  pinMode(REF_3V3, INPUT);


}

void loop()
{
    int x = 0;
    while (x < 7){
    int uvLevel = averageAnalogRead(UVOUT);
    int refLevel = averageAnalogRead(REF_3V3);

    //Use the 3.3V power pin as a reference to get a very accurate output value from sensor
    float outputVoltage = 3.3 / refLevel * uvLevel;
    float UV = mapfloat(outputVoltage, 0.99, 2.8, 0.0, 15.0); //Convert the voltage to a UV intensity level
    reading[x] = UV;
    x++;
    }
float UVaverage = ( (reading[0] +  reading[1] +  reading[2] +  reading[3] +  reading[4] +  reading[5]) / 6);
lcd.clear();
lcd.print("UV Reading: ");
lcd.print(UVaverage);
lcd.setCursor(0, 1);
delay(1000);
x = 0;
  }

  //Takes an average of readings on a given pin
//Returns the average
int averageAnalogRead(int pinToRead)
{
  int numberOfReadings = 75;
  unsigned int runningValue = 0;

  for(int x = 0 ; x < numberOfReadings ; x++)
    runningValue += analogRead(pinToRead);
  runningValue /= numberOfReadings;

  return(runningValue);
}


  float mapfloat(float x, float in_min, float in_max, float out_min, float out_max)
{
  return (x - in_min) * (out_max - out_min) / (in_max - in_min) + out_min;
}
Last edited by backXslash (2016-09-26 15:33:55)
Offline
#82 2016-10-01 14:19:49
Re: Auto Mask Generation
OK will take a look to see if I could make it gui app.
I guess someone did movement already ![]()
in this direction
http://www.supportmaker.com/slicing

Last edited by DLprinter (2016-10-01 14:47:11)
Offline
#83 2017-02-28 08:42:58
- color
- Member
- From: Bulgaria
- Registered: 2016-03-19
- Posts: 84
Re: Auto Mask Generation
Hello to all, thanks for this useful information. I intend to do a measurements and make a mask for my DLP printer. The printer is modified mUVe 3D, Raspberry Pi 3, Arduino Mega and RAMPS. I have purchased a VEML6070 UV sensor
[https://learn.adafruit.com/adafruit-vem … t/overview]
My question is how to wire the UV sensor - Is it possible to connect the module to my Raspi or Arduino or I will need to buy another Arduino and use the module like dedicated unit? If there are a option to wire the UV sensor directly could you advice me how to do it - which pin, etc.
Thank you
Last edited by color (2017-02-28 08:44:07)
Offline
#84 2017-05-04 07:33:45
- bettyponds
- Member
- Registered: 2017-05-04
- Posts: 1
Re: Auto Mask Generation
Here is the mask I generated with Nanodlp:
http://www.nanodlp.com/forum/uploads/55 … 8101ea.pngSo I decided to see what this would look like with the resize algorithm... I followed this process...
Create a PGM file by inserting the values you entered into Nanodlp (make sure to have .PGM as the file extension)
test27.pgm.txtConvert the PGM to PNG (select color=gray):
Use this URL: http://image.online-convert.com/convert-to-png
The image is very tiny right below this text
http://www.nanodlp.com/forum/uploads/db … 4a4159.pngResize to 1920x1080 (select png file from above, section 4 uncheck "keep aspect ratio" & enter 1920 & 1080, section 6 select PNG, section 7 select Lossless Compression, click [resize image] then [download image])
Use this URL: http://resizeimage.net/
http://www.nanodlp.com/forum/uploads/88 … f9cb2b.png
Here is another png converter he can use http://jpgtopng.com/
Offline
#85 2017-08-23 03:37:35
- Doug
- Member
- Registered: 2017-08-11
- Posts: 100
Re: Auto Mask Generation
It will be great if you can copy a grid from excel or table and past in a mask grid box to generate a mask ;
255 255 255 255 255 255 255 255 255
239 239 239 239 239 239 239 239 239
223 223 223 223 223 223 223 223 223
207 207 207 207 207 207 207 207 207
191 191 191 191 191 191 191 191 191
175 175 175 175 175 175 175 175 175
In this way I think it will be ease to change values in future
Offline
#86 2017-08-28 13:38:21
- Doug
- Member
- Registered: 2017-08-11
- Posts: 100
Re: Auto Mask Generation
Hi I'm using the same sensor UVM-30A, how did you put it to work? do you have the code?
Thanks
Offline
#87 2017-09-01 20:12:33
- Doug
- Member
- Registered: 2017-08-11
- Posts: 100
Re: Auto Mask Generation
I'm getting unstables values from the sensor, I can't calibrate my mask. Anyone can help me?
Offline
#88 2017-09-01 21:57:16
- DrNK
- Member
- Registered: 2016-11-19
- Posts: 94
Re: Auto Mask Generation
Does the mask work with LED based printers? How? Does a pixel can dim partially?
Offline
#89 2017-09-05 23:49:25
- Doug
- Member
- Registered: 2017-08-11
- Posts: 100
Re: Auto Mask Generation
Yes you can use it with LED/LCD printer I'm trying to calibrate mine.
I did succeed with these UV sensor.
I'm planning to use a webcam to try a calibration maybe it will work.
Offline
#90 2017-10-20 19:05:19
- elshad66
- Member

- Registered: 2017-03-31
- Posts: 120
Re: Auto Mask Generation
Shain thank for the excellent generator of the mask
But if you add a color, can adjust it together
It was very good, because I'm in CW, I put color 405nm RGB 73,0,188 and mask
Offline
#91 2017-10-27 14:03:12
- Shahin
- Administrator
- Registered: 2016-02-17
- Posts: 3,556
Re: Auto Mask Generation
Elshad,
Color has been added to the mask generator (beta version).
Offline
#92 2017-11-02 16:47:20
- elshad66
- Member
- Registered: 2017-03-31
- Posts: 120
Re: Auto Mask Generation
Shain thank for the Color h added of the mask
i I'm using UVM-30A but the sensor itself from soldering and connected directly to a micro voltmeter
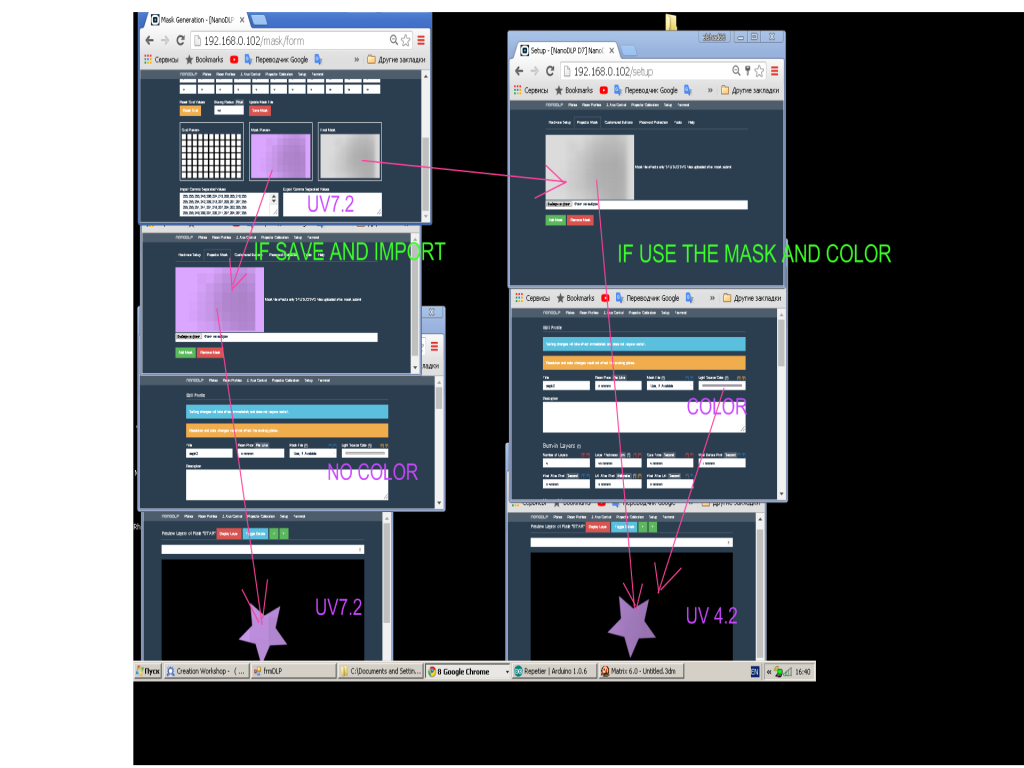
and make a uniform mask through the pi generator relative to the minimum value of the sensor 7.2
if use a mask and color in the profile, the value of the sensor decreases 4.2
if Mask Preview save and import normally 7-7,2 but the Mask Preview is not smoothed
can make the final mask with color?
can also add color a Windows version?
so that it was more understandable problem behold screen
[img = 2.png] http://www.nanodlp.com/forum/uploads/52 … bf8265.png [/ img]
Offline
#93 2018-01-02 06:28:01
- Shahin
- Administrator
- Registered: 2016-02-17
- Posts: 3,556
Re: Auto Mask Generation
Windows version was used to be behind but right now, it is updated.
I am not sure about color support on mask as it could make things unpredictable for users who use lamp hour to modify intensity.
Anybody else experiencing the same issue?
Offline
#94 2018-01-03 00:15:27
- elshad66
- Member
- Registered: 2017-03-31
- Posts: 120
Re: Auto Mask Generation
Thank you for your attention,
I checked the new version,,1769
if someone does not need a color he may not use
please look at the screenshots here
http://moemesto.ru/elshad666/files
I think that setting the lamp clock will not work properly,,I have been using for 3 years ACER 1500 and ACER 6510
And every time I check the lamp clock, readings are different and do not correspond to reality
for example yesterday was 800 today 1200,,so I do not believe the data,,I correct the mask every 2 weeks
teşekkürler
Offline
#95 2018-12-06 16:28:46
- peirof
- Member
- Registered: 2018-10-31
- Posts: 7
Re: Auto Mask Generation
Hi,
i am interested in generate a Mask for my printer.
What sensor its recomened?
Offline