You are not logged in.
- Topics: Active | Unanswered
#1 2016-06-15 14:35:26
- lcluff2000
- Member
- Registered: 2016-04-16
- Posts: 53
Auto Mask Generation
Allow the user to create a mask with the following method:
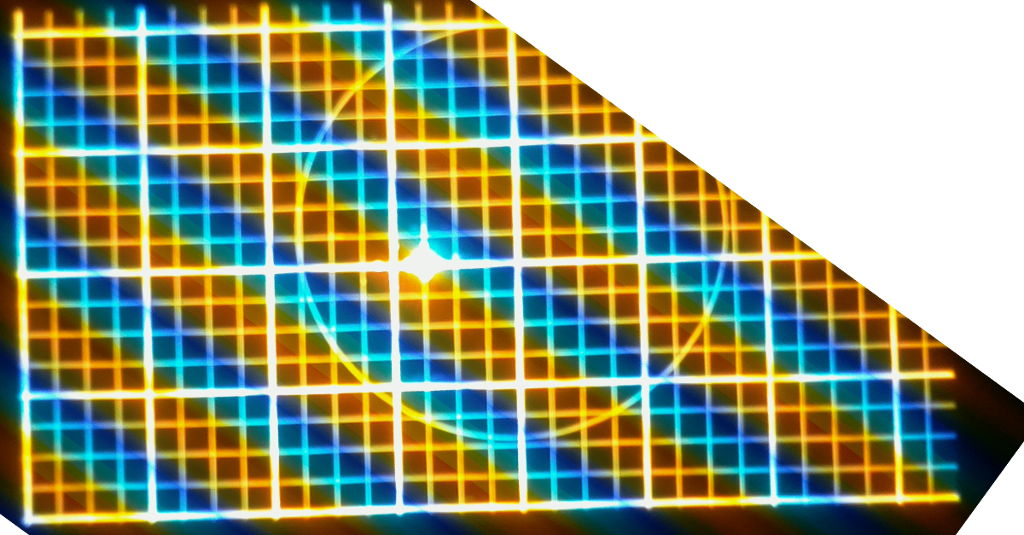
1. Determine and project a grid pattern that covers the projection area
2. Project one at a time, and sequentially a 1 cm dot for each grid point intersection
3. The user places a UV detector over the dot and clicks a button to send a serial stream to nanodlp containing the magnitude of the UV light at that point (see http://www.buildyourownsla.com/forum/vi … f=5&t=3684). You define the format, pins, baud rate, etc to use and I'm sure we can modify the arduino uno code to provide it to nanodlp on the raspberry pi. Note that the grid pattern can help the user align the sensor for more accurate results.
4. Repeat steps 2 & 3 for 3 cycles
5. Average the data from the 3 cycles after throwing out outliers
6. Calculate a mask based on the averaged points. One idea is to use bicubic interpolation (see https://mathformeremortals.wordpress.co … ys-ranges/). I have used this to generate a 192x108 mask. It works, but it is really slow. So perhaps there is a better method.
Another thought I had was you could allow mask validation by:
1. Performing steps 1 to 4
2. Display the results to the user (perhaps showing std deviation of the rows and columns). If the mask worked, you should see a fairly even distribution.
And another thought:
1. Use the mask validation to determine suggested cure times (This may take some experimentation, but perhaps allowing a formula so the cure time can be calculated from the mask values)
Offline
#2 2016-06-16 05:25:13
- Shahin
- Administrator
- Registered: 2016-02-17
- Posts: 3,556
Re: Auto Mask Generation
It is too much work on nanodlp side for something which will be rarely used by users. And it will be hard to use.
But I could add grid and mask generator to the program. But data should be entered manually. Let me know if they will be useful.
I have worked on an alternative before.
Display Grid
RPi takes photo
Detect projector area
Calculate light strength in different positions
In addition to making mask, Also we could detect if the projector is out of focus or not. Even give clue to the users how much they are close to focus in realtime so they could dial focus ring until getting acceptable focus level.
And it could runs each time before print (do not start printer if it is out of focus), also data could be used to optimize cure time by detecting weakening blub output.
Unfortunately banding would not let me to calculate correct values. So I have abandoned the method. I think probably there is a suitable filter to use in these kind of conditions to prevent banding.
Offline
#3 2016-06-17 00:12:06
- lcluff2000
- Member
- Registered: 2016-04-16
- Posts: 53
Re: Auto Mask Generation
A means to generate the grid, enter data, and generate a mask would definitely be useful when using a UV sensor (even if those values are entered by hand). This is measuring the direct light intensity from the projector at the vat floor where the resin will cure.
I really like the concept of the alternative as well. Here are some questions:
* What is "banding"?
* Would the RPi camera take the photo straight down onto the vat floor? Or, from an angle? Or, from the backside of the vat?
* Would you put a piece of paper down on the vat floor to block most of the intense light that might overwhelm the camera sensor? (I've seen forums describe this technique)
Here's what I really like about the alternate idea:
* Use a simple RPi camera to make a mask (potentially with a filter as described below)
* The real-time focus feedback
* Diminishing bulb intensity feedback
* You could potentially detect the projector length and width to dial in the right values for the slicer
Here are some thoughts:
* Most resins cure at around 400nm frequency light. If a band pass filter for UV light were used on the camera lens (or UV sensor), that may help make the mask more accurate.
* See this link for a cheap UV filter, but make sure to read all the comments because there are some disadvantages: http://www.instructables.com/id/Photogr … /?ALLSTEPS
* See this link for a 400nm band pass UV filter for $30 -- check for others as well (http://www.edmundoptics.com/optics/opti … ers/28404/
* An expensive CCD camera in the right UV range: http://www.edmundoptics.com/cameras/nir … ras/56346/
Offline
#4 2016-06-17 05:33:40
- Shahin
- Administrator
- Registered: 2016-02-17
- Posts: 3,556
Re: Auto Mask Generation
A means to generate the grid, enter data, and generate a mask would definitely be useful when using a UV sensor (even if those values are entered by hand). This is measuring the direct light intensity from the projector at the vat floor where the resin will cure.
I will add both feature to my task lists.
I really like the concept of the alternative as well. Here are some questions:
* What is "banding"?
* Would the RPi camera take the photo straight down onto the vat floor? Or, from an angle? Or, from the backside of the vat?
From bottom but it could have angle as the new rpi cam has better resolution which could be used to fix perspective problems.
* Would you put a piece of paper down on the vat floor to block most of the intense light that might overwhelm the camera sensor? (I've seen forums describe this technique)
I think it will be ideal if we could work with resin filled vat using only red pattern which will not cause resin cure.
Here's what I really like about the alternate idea:
* Use a simple RPi camera to make a mask (potentially with a filter as described below)
* The real-time focus feedback
* Diminishing bulb intensity feedback
* You could potentially detect the projector length and width to dial in the right values for the slicer
I am sure there are couple of other tricks would be possible (theoretically) using cam, for example alarming on low resin level or finding out uncalibrated platform (part of platform pressed hard on vat before other sides reaching that) Even with some resins, it will be possible to guess if parts are fallen or not. And etc.
Here are some thoughts:
* Most resins cure at around 400nm frequency light. If a band pass filter for UV light were used on the camera lens (or UV sensor), that may help make the mask more accurate.
* See this link for a cheap UV filter, but make sure to read all the comments because there are some disadvantages: http://www.instructables.com/id/Photogr … /?ALLSTEPS
* See this link for a 400nm band pass UV filter for $30 -- check for others as well (http://www.edmundoptics.com/optics/opti … ers/28404/
* An expensive CCD camera in the right UV range: http://www.edmundoptics.com/cameras/nir … ras/56346/
I hope it will be possible to measure intensity of UV range light by measuring other part of light spectrum too (I guess blub light output should homogeneous at least for light spectrum range). We do not need absolute intensity value just relative value will be enough. Hopefully somebody could test those filters as I do not have access and knowledge to test these things.
Offline
#5 2016-06-17 13:55:36
- lcluff2000
- Member
- Registered: 2016-04-16
- Posts: 53
Re: Auto Mask Generation
I will add both feature to my task lists.
Very Cool! These will be great features!
If when entering the data you can tab sequentially from field to field, I could potentially modify the uno to be a HID keyboard. When you measure a value by clicking an uno button, it would "type" the measured value in the field and then "press" [tab]. So it could automatically sequentially fill out the fields. http://mitchtech.net/arduino-usb-hid-keyboard/
I like the possibility of the following:
* Low resin detection
* Uneven platform detection <= Maybe make this a homing detection too? On muve3d printer this is a common issue and you could potentially automatically home both sides.
* Fallen part detection <= This is pretty common and wastes a ton of time waiting for a print that is already ruined.
I hope it will be possible to measure intensity of UV range light by measuring other part of light spectrum too (I guess blub light output should homogeneous at least for light spectrum range). We do not need absolute intensity value just relative value will be enough.
Interestingly, projecting red (600nm) may be a better relative approximation of the UV band (400nm) than white light (multiple components across the spectrum). See the spectrum output for the muve3d projector: http://www.muve3d.net/press/projectors/
On banding...
I wonder if the vat bottom is acting as a prism and splitting the white light into its component values as it is reflected from both the bottom and top surfaces of the glass? See http://science-edu.larc.nasa.gov/EDDOCS … olors.html. If this is the case, then projecting red may prevent the banding.
Offline
#6 2016-06-17 13:58:46
- lcluff2000
- Member
- Registered: 2016-04-16
- Posts: 53
Re: Auto Mask Generation
Just another quick thought... if you project red squares separated by a grid (same size grid as for the UV sensor), then the algorithm could determine the average intensity within each square, and you could feed that into the mask generation algorithm used for the UV sensor.
Offline
#7 2016-06-23 21:04:27
- Shahin
- Administrator
- Registered: 2016-02-17
- Posts: 3,556
Re: Auto Mask Generation
Do you have a sample of grid which should be displayed? Also sample of data which mask generator should import.
Offline
#8 2016-06-24 01:11:59
- lcluff2000
- Member
- Registered: 2016-04-16
- Posts: 53
Re: Auto Mask Generation
The grid sample is the uvcal.stl document that can be downloaded here: http://www.buildyourownsla.com/forum/vi … 684#p11719
Three data samples (DS1, DS2, DS3) are this OpenOffice document: bicubic-interpolation-larry-v1.ods
That file also gives an example of bi-cubic interpolation. It was really slow, and I honestly don't remember if I left it in a working state.
Offline
#9 2016-07-09 20:39:10
- lcluff2000
- Member
- Registered: 2016-04-16
- Posts: 53
Re: Auto Mask Generation
Here's another concept for auto mask generation that may be very simple to implement and easy for the user... Internal to NanoDLP, generate slices of a model that is simply a series of 2mm posts in a grid that covers the entire build area. After the burn-in layers, print the first layer starting at a high cure time and then sequentially lower the cure time for each layer printed (you would have to keep peel speed and height constant). My assumption is that as the cure time decreases, eventually the posts that are getting the least light will break away from the model and stick to the vat bottom. The camera could detect this ("fallen part detection") and record the location and cure time. Eventually every post would fail. With this information you could use interpolation to create a mask. The user does nothing except clean the vat of the multiple "fallen parts" at the end. I'm not positive this will work, but I thought I would throw it out there. Thoughts?
Offline
#10 2016-07-10 17:15:04
- Shahin
- Administrator
- Registered: 2016-02-17
- Posts: 3,556
Re: Auto Mask Generation
Unfortunately almost all of new cast resins which I have tried were not transparent at all so It will be very hard to detect any piece on bottom of VAT.
Offline
#11 2016-07-12 04:04:36
- lcluff2000
- Member
- Registered: 2016-04-16
- Posts: 53
Re: Auto Mask Generation
I suppose one could measure the stumps on the build plate with a caliper and enter those values in.
Offline
#12 2016-07-16 04:31:24
- lcluff2000
- Member
- Registered: 2016-04-16
- Posts: 53
Re: Auto Mask Generation
I hope you don't mind me throwing out another concept idea...
For the UV sensor, rather than taking measurements and entering all that data in, here is another possible method:
For each grid section, allow the user to adjust the grayscale value being displayed (maybe one slider for big changes and a small slider for small changes)
The user could simply change the sliders on each grid section until the UV Sensor displays the value they want. The user could indicate [done] and have that show on the UI. Perhaps the user could select the section they are working on, or the UI enforces going in a particular order.
Then you could use the grayscale values to create the mask. Seems like it would be pretty accurate too. Thoughts?
As a side note, it would be really helpful if there were a way to regenerate the plates using the latest uploaded mask (so you don't have to re-create plates every time you change the mask). Even better if you could have multiple masks and select the mask on the plate (for example, you could use a brighter mask if you are only using the center portion of the plate for the print for faster prints). Just an idea. Thanks!
Offline
#13 2016-07-16 20:45:39
- Shahin
- Administrator
- Registered: 2016-02-17
- Posts: 3,556
Re: Auto Mask Generation
Good suggestion.
STL and SLC files could be very large, in order to save space, program deletes source files as soon as it extract required data. Because of that mask changes could not be applied to the converted files.
Offline
#14 2016-07-22 16:34:59
- Shahin
- Administrator
- Registered: 2016-02-17
- Posts: 3,556
Re: Auto Mask Generation
Lets finalize the plan based on your the most recent post.
User decide how many points she/he want to measure
Nanodlp display a grid based as Image and based on the number of points draw input boxes
User measure points on side and find out dimmest point
User enter dimmest point's value into interface
User select next input
Nanodlp disable all points and just display squire which corresponding input has been focused
User measure point and enter value
User continues step 5 ~ 7 for all points
User could press display mask anytime and mask will be displayed
User could check if whole surface brightness is same or continue tweak values
User click on export and mask will be saved
Do you have any suggestion?
Offline

#16 2016-07-31 02:49:41
- lcluff2000
- Member
- Registered: 2016-04-16
- Posts: 53
Re: Auto Mask Generation
I just saw the plan. I've been out-of-town. The challenge I have had is determining a mask from the measured points. I have found that the formula to go from measured points to a working mask is non-linear. I ended up using a 5th order regression to try to get a mask that makes all the points the same measured value.
To avoid all of that, I would suggest the following:
1. User decides how many points she/he wants to measure
2. Nanodlp displays grid based as an image (with no mask applied) on the projector, and displays a edit field for entering the dimmest values on the UI
3. User measures points to find the dimmest value
4. User enters dimmest point value into interface
5. User selects next input (or chooses a particular grid position - there may only be one wrong position that needs to be corrected)
6. Nanodlp displays only grid position #1 & user places sensor on grid position #1
7. User enters a value between 1 to 256 (1=full brightness, 256=black) to dim the grid position until the sensor reading matches the dimmest value
8. User continues steps 5 ~ 7 for all points
9. User could press display mask anytime and mask will be displayed (allow to choose with or without grid)
10. User could check if whole surface brightness is same or continue to tweak values
11. User click on export and mask will be saved
The difference here is that when you calculate the mask, you already know how much to dim at each grid position. You will not need to figure out some special formula to create the mask.
Offline
#17 2016-07-31 03:00:21
- lcluff2000
- Member
- Registered: 2016-04-16
- Posts: 53
Re: Auto Mask Generation
Note on #1: I would suggest allowing them to enter 2 values: (1) # of points for height (minimum 3, default 5), and (2) # of points for width (minimum 5, default 9). This way they don't enter something that doesn't make sense.
Offline
#18 2016-07-31 03:10:18
- lcluff2000
- Member
- Registered: 2016-04-16
- Posts: 53
Re: Auto Mask Generation
Note on #5: The user could press a [next] button or enter a grid position number
Note on #6: displays grid position #1 (if [next] is pressed) or the grid position number entered
Note on #7: may need to be 1 ~ 1024 (I'm not sure)
Offline
#19 2016-08-01 03:05:29
- Shahin
- Administrator
- Registered: 2016-02-17
- Posts: 3,556
Re: Auto Mask Generation
Note on #5: The user could press a [next] button or enter a grid position number
I think displaying tabular inputs same as grid will make things easier.
Note on #7: may need to be 1 ~ 1024 (I'm not sure)
Couple of issues need to be addressed before supporting higher than 256 values
1. PNG format supports up to 24bits (32bits with alpha layer). We are not depend on png format or any encoding so this is not a big deal.
2. Require HDMI v1.4 or higher on both sides
3. On RPi itself hdmi_pixel_encoding setting makes me believe, RPi only supports 24bits and nothing higher. Maybe it is a hardware restriction on GPU.
Any suggestion about size of the measurement points?
Offline
#21 2016-08-01 16:09:26
- lcluff2000
- Member
- Registered: 2016-04-16
- Posts: 53
Re: Auto Mask Generation
I'm totally supportive of #5 visual grid
On #7, (1) having higher capability to define greyscale is ok (24 bit verses 8 bit), (2) I don't know, (3) I don't know
On size of measurement point, the original article uses 1/2" diameter dots. The sensor itself is about 1/8"x1/8" square. I would recommend 1/4" or 3/8" square dot.
Offline
#22 2016-08-01 18:29:19
- Shahin
- Administrator
- Registered: 2016-02-17
- Posts: 3,556
Re: Auto Mask Generation
#7 you cannot use 24bit for grayscale 8bit for each color as you need same value for all three colors for perfect gray, technically you could only have 256 shades of grey.
Offline
#23 2016-08-01 22:25:16
- lcluff2000
- Member
- Registered: 2016-04-16
- Posts: 53
Re: Auto Mask Generation
I understand now. Thank you.
Sounds like you have a good plan.
I'm really anxious for this feature and I think it will put nanodlp at the cutting edge of DLP mask creation!
Offline
#24 2016-08-18 10:05:15
- Shahin
- Administrator
- Registered: 2016-02-17
- Posts: 3,556
Re: Auto Mask Generation
You can try mask generation feature on the beta version on projector calibration page.
It is not perfect right now, one the edges we need some smoothing/blurring and etc.
Offline
#25 2016-08-18 15:52:49
- lcluff2000
- Member
- Registered: 2016-04-16
- Posts: 53
Re: Auto Mask Generation
Super! I'll try to carve out some time tonight to give it a try!
Offline